


"Snow Days" --- SOLD

6"x6" - oil on canvas
The last time it snowed here in Austin was 2 years ago, and it happened in the middle of the night. It lasted about an hour and promptly melted, before we woke up. I DO remember it snowing a few times when I was a kid, and getting snow days off from school. It was great. Happy Holidays to everyone, and all you getting snow, please send us a little!!! Thanks.


"Hot Hot Hot" --- SOLD

6"x6" - oil on canvas
My husband and I have been trying to teach our 1 and a half year old son, Jacob, the meaning of the the word "hot". When we say something is hot he says "hah hah hah" and backs away. It is such an endearing sound (you'd have to hear it) that when he finally started sounding out the whole word "hot," we were dissapointed and started saying "hah" instead. Kids really make you appreciate the simple things!
"Marble Galaxy" --- n/a

6"x8" - oil on canvas
I had an epiphany this morning. I've had it before, but it really hit me hard today: Life is a process. There's no end result. There's no lasting glory. There's just a constant work in progress. We are all searching for that perfect hair cut, the perfect cup of coffee, pill, house, job…etc. And I am constantly striving for the perfect painting. It causes me stress when it eludes me every time. But what if I was in it for the process rather than the result??? Why is it so hard, as humans, to enjoy the ride instead of rushing to the end? Are we there yet?
"Escape" --- SOLD

6"x8" - oil on canvas
This is an old painting (~1 month old) that I somehow forgot to post. Woops.

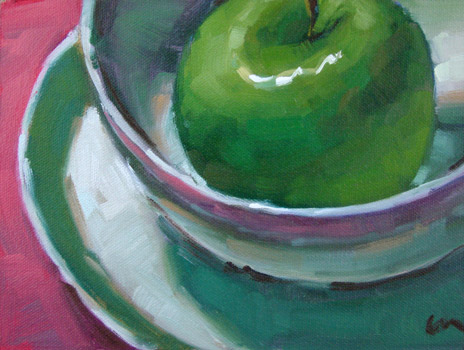
"Apple Star" --- n/a

6"x8" - oil on canvas
I know I don't always come up with the most inspired titles, by a longshot, but here's today's painting anyway.
"Great Grapes"

6"x8" - oil on canvas
My stepdaughter, Maddie, came up with the title for this one. Thanks Maddie!

Painted Rims Installed on Car
A follow up to my DIY Paint your car Rims article, I promised pics of the rims on my Integra to see how it will look.
Well I had installed them last week as winter has come and some snow has already been seen. Nothing to use my winter tires for yet, but that will come.
I was pretty impressed with how the gunmetal rim with polished style lip looked on my green Integra. I always was going back and forth if I should paint my rims gunmetal, but now I am quite happy with the end result.
Take a look:


Hope my DIY paint your rims article helped, and I hope this will help others picture what the stock SE rims will look like gunmetal with a polished lip and on a green integra like mine.
Regards, MK
Visit my Car Detailing Guide in my other blog. Updates to come real soon.
Well I had installed them last week as winter has come and some snow has already been seen. Nothing to use my winter tires for yet, but that will come.
I was pretty impressed with how the gunmetal rim with polished style lip looked on my green Integra. I always was going back and forth if I should paint my rims gunmetal, but now I am quite happy with the end result.
Take a look:
Hope my DIY paint your rims article helped, and I hope this will help others picture what the stock SE rims will look like gunmetal with a polished lip and on a green integra like mine.
Regards, MK
Visit my Car Detailing Guide in my other blog. Updates to come real soon.
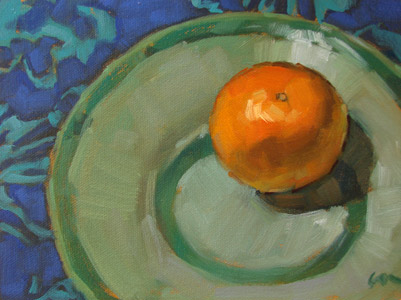
"Perspective" --- SOLD

6"x8 - oil on canvas
This was an experiment to see if I could show depth with one radish and a different perspective.

Classic Car Restoration: 1969 Ford Mustang
Looking for some car body work videos and restoration projects I came across this video on YouTube.
a 1969 Ford Mustang was taken from a pretty beat up shape to a fantastic blue painted Mustang that is ready to rule the roads! Take a look at that automatic launch at the end of the video. The amazing part I found was the wiring by the steering wheel and how the interior looked before and after. You can see during the video how the body of the Mustang has been sanded and prepped for painting. The light colored grey primer was put on the outside of the car, and then the final top coat of blue makes it shine. Take a look at this beauty:
a 1969 Ford Mustang was taken from a pretty beat up shape to a fantastic blue painted Mustang that is ready to rule the roads! Take a look at that automatic launch at the end of the video. The amazing part I found was the wiring by the steering wheel and how the interior looked before and after. You can see during the video how the body of the Mustang has been sanded and prepped for painting. The light colored grey primer was put on the outside of the car, and then the final top coat of blue makes it shine. Take a look at this beauty:
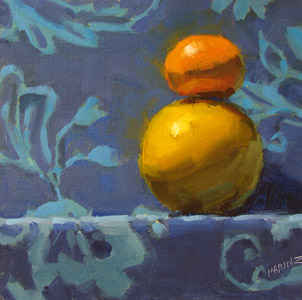
"Wunderpot" --- SOLD

6"x6" - oil on canvas
My friend, Jennifer, lent me this pot to paint. Thanks! With the polka-dot fabric it looks like a teapot from Alice in Wonderland to me, hence the title.
"Piggy Parasol" --- n/a

6"x8" - oil on canvas
My stepdaughter, Maddie, lent me her miniature piggy bank to paint, and I thought it looked perfect with this flower. My dad suggested the name: "piggy parasol," which fits, huh? So really, this was a group project! Thanks guys!
"Extra Yolk" --- SOLD

6"x6" - oil on canvas
A lot of the daily painters have agreed to paint eggs today, and this is my contribution. On Monday, all the eggs will be displayed at http://www.dailypainters.com/.

"Oranges 5" --- SOLD
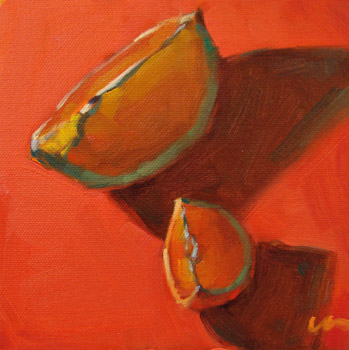
6"x6" - oil on canvas
This is the fifth and final orange painting. I cut them up...and don't think they'll last much longer in this state. I think I might have them for lunch. :)
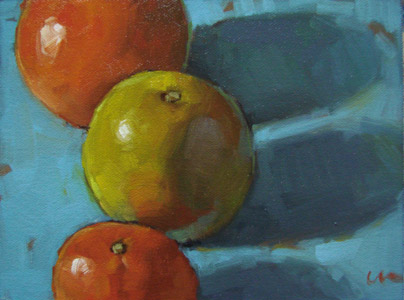
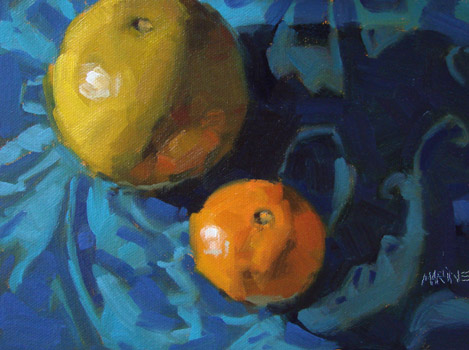
"Orange 2" --- SOLD
6"x8" - oil on canvas
I have become obsessed with these oranges and this fabric, so I've decided to do a series. This is number 2.

"Milk & Cement" --- SOLD

6"x8" - oil on canvas
Here are a couple of relics from my husband's childhood. We gave them to Jacob, our 19 mo. old son, but he just smashed them against my husband's computer, so we took them away. They have been sitting on the banister at the top of the stairs for weeks now, just begging to be painted, so here they are: a milk truck next to a cement truck.

Paint Your Car Rims
Paint your own Rims? Who would of thought something previously done by professionals could be done in your own home.
While, the concept of painting your own rims has been around a few years now, many questions pop up of how to do it and I thought I would share my own experiences with painting my Integra stock rims. I have read up many examples of how to do this, but my first time trying was this year when I chose to refinish my winter rims. I was quite please with the outcome.
First, what the hell do you need to paint your rims? Paint of course :) This is where Duplicolor comes in with their wheel paint. They offer paint colors to match your style coming in white, gunmetal, classic silver and bronze as well. I chose to do mine in gunmetal leaving my lip the stock polished style look. So here are your options:

So you chose your colour, bought your paint and are semi-ready. First, you need to sand down your rims. Why? This gives the surface a rough texture so the paint has something to adhere to. Reference the article to polish your rims on how sanding of the rims works. The only difference with this is how far you want to go. In my case, being winter rims painted I chose not to go through the process of stripping the paint on the rims completely. I simply sanded down the surface with 300 grit sandpaper ensuring to make everything sanded equally. This gives the rough surface required for the paint to adhere, and as long as your rims had no damage it should be good enough.
Your rims are sanded, you have your paint and now are ready. First, make sure you clean all sanding dust off the rims and ensure a totally clean surface so the paint will stick and not flake off after your first drive out with your newly painted rims!!! Here are my rims washed and ready to completely dry before painting:

Here is an upclose shot of my Sanded Rim ready to have a fresh coat of Gunmetal paint applied to it:

You will notice my rims are masked off with newspaper and masking tape. Of course you want to do this so you dont turn your tires into the color you are painting. I don't want gunmetal painted tires. Also if you look close enough, you will know that the lip has been masked off as well. So I carefully applied the masking tape on the lip to protect it from being painted as well. Also, you know the lil thing you pump your air into, mask that off as well unless you want that to have a color change as well :)
The rims are dry, you have masked off what you dont want painted and now you are ready. Put some newspaper on the ground and place the rim on top of the newspaper. You don't want to paint the concrete underneath the rim so keep it clean with the newspaper.
Now apply your first coat of paint (gunmetal on my rims). Here is my first coat on two of the rims (the two on the right have been painted):

Here are pics of the rims painted and masked:


A couple of good shot of the Rim Painted with the Clear Coat shining while drying:


Now put away your rims somewhere and let them dry so the paint has time to cure. I left mine for a couple days and then took off the masked newspaper and tape. And the results are in.
Three Rims lined up and painted:

Up Close view of Dried Clear Coat, Nice and shiny :)

Here is single shots of the rims without the center caps installed yet:


Here is single shots of the rims with center caps installed yet:


Hope you enjoyed my venture into painting my own rims and hope this may tempt you trying the same with your old rims that you were maybe thinking of throwing away, but now can refinish into a nice set of rims.
Regards, MK
Car Buyer Guide gives insight into buying your car or seeing what Car Concepts are coming out!
While, the concept of painting your own rims has been around a few years now, many questions pop up of how to do it and I thought I would share my own experiences with painting my Integra stock rims. I have read up many examples of how to do this, but my first time trying was this year when I chose to refinish my winter rims. I was quite please with the outcome.
First, what the hell do you need to paint your rims? Paint of course :) This is where Duplicolor comes in with their wheel paint. They offer paint colors to match your style coming in white, gunmetal, classic silver and bronze as well. I chose to do mine in gunmetal leaving my lip the stock polished style look. So here are your options:
So you chose your colour, bought your paint and are semi-ready. First, you need to sand down your rims. Why? This gives the surface a rough texture so the paint has something to adhere to. Reference the article to polish your rims on how sanding of the rims works. The only difference with this is how far you want to go. In my case, being winter rims painted I chose not to go through the process of stripping the paint on the rims completely. I simply sanded down the surface with 300 grit sandpaper ensuring to make everything sanded equally. This gives the rough surface required for the paint to adhere, and as long as your rims had no damage it should be good enough.
Your rims are sanded, you have your paint and now are ready. First, make sure you clean all sanding dust off the rims and ensure a totally clean surface so the paint will stick and not flake off after your first drive out with your newly painted rims!!! Here are my rims washed and ready to completely dry before painting:
Here is an upclose shot of my Sanded Rim ready to have a fresh coat of Gunmetal paint applied to it:
You will notice my rims are masked off with newspaper and masking tape. Of course you want to do this so you dont turn your tires into the color you are painting. I don't want gunmetal painted tires. Also if you look close enough, you will know that the lip has been masked off as well. So I carefully applied the masking tape on the lip to protect it from being painted as well. Also, you know the lil thing you pump your air into, mask that off as well unless you want that to have a color change as well :)
The rims are dry, you have masked off what you dont want painted and now you are ready. Put some newspaper on the ground and place the rim on top of the newspaper. You don't want to paint the concrete underneath the rim so keep it clean with the newspaper.
Now apply your first coat of paint (gunmetal on my rims). Here is my first coat on two of the rims (the two on the right have been painted):
Here are pics of the rims painted and masked:
A couple of good shot of the Rim Painted with the Clear Coat shining while drying:
Now put away your rims somewhere and let them dry so the paint has time to cure. I left mine for a couple days and then took off the masked newspaper and tape. And the results are in.
Three Rims lined up and painted:
Up Close view of Dried Clear Coat, Nice and shiny :)
Here is single shots of the rims without the center caps installed yet:
Here is single shots of the rims with center caps installed yet:
Hope you enjoyed my venture into painting my own rims and hope this may tempt you trying the same with your old rims that you were maybe thinking of throwing away, but now can refinish into a nice set of rims.
Regards, MK
Car Buyer Guide gives insight into buying your car or seeing what Car Concepts are coming out!
Subscribe to:
Comments (Atom)


